The Joopacabra build thread.

This site may earn a commission from merchant affiliate links, including eBay, Amazon, and others.

mustanggarage

Well-Known Member
Joined
Jun 13, 2016
Messages
213
Reaction score
141
Location
Iowa
well since this site is new I guess I will go through the build of my 90 yj build. I have posted it on garage retreat already, but maybe it will help someone here.

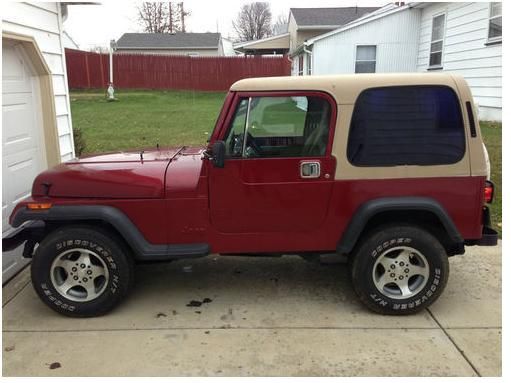
I bought this jeep in 2013 for my daughter.

my wife asked me why it said joop on the side when we got it lol so that is how it got the name joopacabra. here is a picture of my new to me yj.

it is a 1990 with the 4.2 and automatic. it was exactly what i was looking for.

I had a 95 when I lived in utah that I did a 4 to 6 swap and a bunch of other things to. so I am not entirely a newbie to jeeps. I spend a lot of time building and playing with mustangs so I have a fair amount of experience tinkering with cars and I have a really nice garage and tool selection to play with.
2thumbup.gif
here is a thread I did on my garage.
http://www.garageretreat.com/forums/f7/welcome-doghouse-1794/

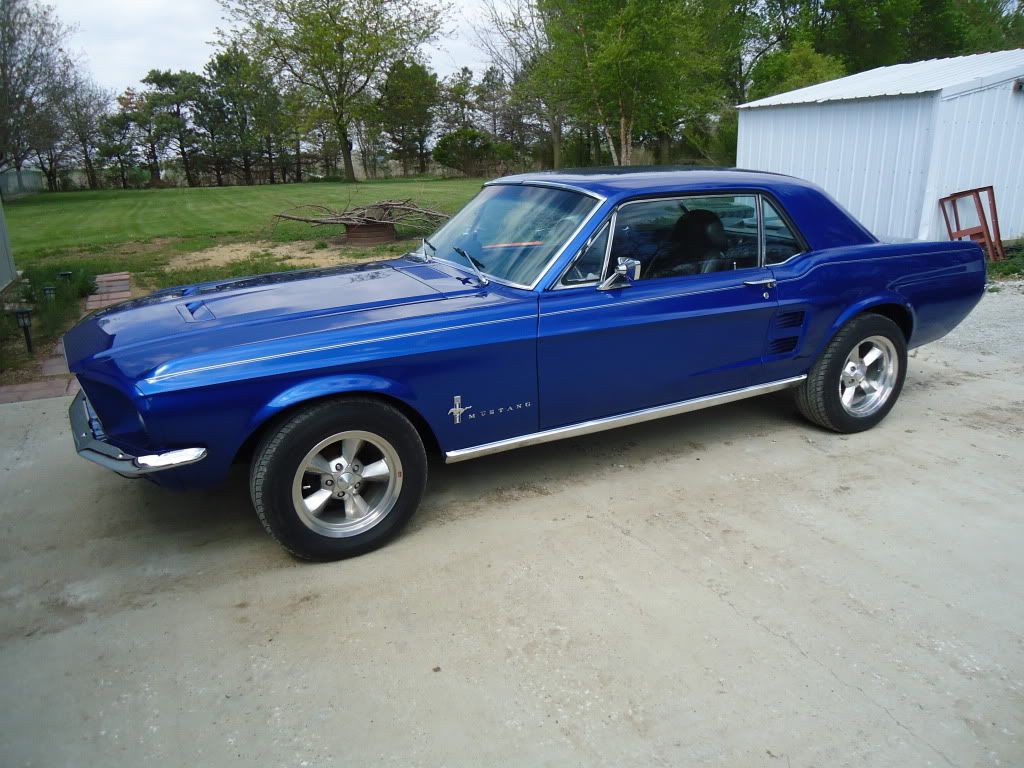
I started looking for this jeep because I wanted something I could fix up for my daughter to drive to school in the winter, and because I really missed my old yj. We built a nice 67 mustang for her but it actually turned out a bit too nice and now she is afraid to drive it to school for fear of it getting vandalized so it is used more for special occasions and shows than as a daily like I had planned. here is a pic and thread of it if anyone is interested.


http://www.moddedmustangs.com/forums/projects/224094-mustang-sarah-pic-heavy.html
Anyway, I wanted a jeep that needed some mechanical work because I like doing that sort of thing, but I wanted one that the body was in decent shape because I don't like doing body work.
I wanted an automatic because the plan was for my daughter to drive it. I also wanted the 6 cylinder because after the headache I had doing the 4 to 6 swap before, I did not want to go through all that again lol.

the initial plan was to fix all of the little problems that it had and at some point swap in a fuel injected 4.0 engine. I have had it for 3 years now. I have already done a lot to it so I will go through some of that in the next few posts.
 
Last edited:
I bought this jeep off ebay from someone in Ohio. I never met him and I had the jeep shipped to me. that is the first time I had ever done that so I was not sure what I was going to get. the ebay description said the jeep ran but in talking to the owners mother after I bought it she said that he was having some problems with the idle. I asked them to send me some pictures of the engine because I assumed from the reading I had done on this year jeep that it had the stock carbureter on it and that was probably why it was having problems. they never did send me the pics so I had no idea what I was going to get when it got here. I was very excited when the truck pulled up. we tried to back the jeep off the trailer but it wouldn't start. we had to jump start it and we finally got it running enough to back it off the trailer. it would not stay running at all. I finally got the jeep up the half mile dirt road to my shop and it died again at the shop door so I pushed it into the shop to see what I had bought lol. here are some pics.


overall I was very happy with it. so after I got it into the shop I put the battery charger on it and started looking it over. the first priority was to get it running properly.
 
I was very pleasantly surprised when I popped the hood to see the weber carb already installed. My Dad is a retired mechanic. he lives nearby now. I finally got him to move out here after I built the shop. He did not want to leave all his tools and stuff at home but since my Mom died he was living all alone out there so I built the shop and convinced him to move out here. Now we tinker in my garage for fun.

anyway once we started looking at the engine we found a couple problems right off. first was that the vacuum advance was completely missing off the distributor. the little lever was sticking out of the distributor just flopping all over the place. secondly the vacuum lines were totally screwed up. and the lines to the transfer case were just cut off with what looked like a pair of side cutters. anyway after quite a bit of reading on here about the vacuum lines we got that sorted out, put in a remanufactured distributor, new plugs and wires, and a new fuel filter. then we did the nutter bypass and voila.


it started right up.
cheers.gif
We spent a bit of time setting the timing, and adjusting the carburetor and it starts right up and ran like a champ.
 
ok so then I took it for the first real test drive... and found several more problems lol.

1. no heat at all.
2. the heater fan would not shut off. just blew cold air.
3. there were a lot of holes in the floor and around the doors and hardtop and it was plain cold driving (again this was in early january when the jeep finally arived.)
4. the water temp gauge didn't work.
5. the front end needed a lot of work there was a lot of slop in the steering.

so we tore into it. to make a long story short. I found that the prior owner had not installed a thermostat when they put it together. so I put in a new 190 degree thermostat and that helped it started to make a bit of heat just not much. it did however fix the temp gauge lol. I guess it just wasn't getting warm enough to register on the gauge. anyway I decided the heater core must be partially clogged. so I swapped the heater core and did the blower motor upgrade at the same time. I also cleaned the bed liner off the heater plenum. (the prior owner just sprayed it all over in there without masking anything off). then I took the heater controls apart and fixed the switch to shut the fan off. put it all back together and it heats up nicely now.

I had a ball joint in the front suspension that was shot and that was one reason the front end wandered so much so I swapped that. I tried tightening the steering gear box and it helped a bit but it was leaking fluid all over and there was still slop in the box so I bought a new steering box and swapped that in. that fixed my handling up nicely.

the prior owner had also decided to trash the vacuum activated front axle disconnect and the posilock cable was included in the purchase. since the vacuum system had been trashed and I had used the posilock before I went ahead and swapped that in. I found out that I had a bad passenger side ujoint at that time and fixed it as well.

now I have four wheel drive.
 
ok. so after I did that much I just drove it that way for a while till it got warm out then my daughter wanted to take the top off it and put a bikini top on it for summer and I wanted to look at what was wrong with the weatherstripping.
so I put a power hoist a top in.


and pulled the top. I found several issues with the seals, first the drivers side corner was missing the corner piece. there was some of the old drivers door weatherstripping stuck to the top, but most importantly I think was that the aftermarket roll bar was not adjusted properly. the adjustment slot was not long enough so they could not tilt the windshield back to the proper position so it leaned forward about a 1/2 inch to far leaving a big gap and making the top not fit right. so I spent a little time with a drill and a dremel until I got the windshield to fit properly. then I took a look at the top.

don't get me wrong this jeep is in great shape for how old it is, there is some small problems here and there and this is a project vehicle so I have to find something to tinker with right?
anyway as I said above the front metal trim piece was rusted.


it doesn't copy well but the old window tinting is coming off in places and there are bid holes in it.


the wire to the rear defroster was broken, I don't know if the rest of the system works or not. that is something I still need to sort out.


the good news is the wiper worked. the dome light did not.


you can't see him to well but my buddy Josh, my shop dog is in the back seat. he loves the joopacabra. all my dogs love to go for rides, but Josh is the only one I know won't jump out while I am in the store or whatever.

ok next task was to start working on the top. My Daughter started 10th grade at this time so she finally got her school permit so she could drive to school. she was afraid to take her mustang so she wanted to take the joop unless it rains so I neededto get the top back on it pretty soon. it needed a fair amount of work but nothing major. a coat of paint inside and out, some new weatherstripping and some elbowbow grease. I decided to paint the inside bright white with appliance epoxy enamel and the outside semi gloss black. I thought about painting it the tan color because I liked the look of it when I got it, but I decided black would be easier to touch up when the inevitable booboos occur.

so I ordered a bunch of parts.

 
Last edited:
I spent a lot of time on the inside with a scotch brite and wax and grease remover. then I masked the whole thing off, and painted the inside with some appliance epoxy white. then I set it down on some buckets to work on the outside.


then I read that many people had successfully used a roller to paint the top. I was unsure about that but I decided to give it a try. we decided to use semigloss black paint. first because that is what my daughter wanted and second because I thought it would be easier to touch up later. anyway...


then I lifted it up again and put the new window trim and seals in place, and spent several hours scraping 2 layers of window tint off the windows. I would like to re-tint it at some point but the old stuff had to go as it was peeling off and looked like crap.


I think it looks pretty good.
 
I drove it like that for a while until it started to get cold. Then I took the bikini top off and pulled the seats and center console. I had to have my daughter help me with the center console. someone had to hold the wrench on the underside after all lol.


then I took the rear view mirror off and put one in from a 99 mustang convertible. it has the built in maplights and surprisingly it slipped right onto the original mounting bracket. then I ran the wires down behind the weatherstripping and plugged into an add a circuit in the fuse box.


yes the windshield is dirty but its a jeep for crying out loud lol.

then I started putting the carpet in. I want to be able to pull it out and replace it easily when it gets wet or stained so I did not use any adhesive. it is just held in by bolts and a few screws.

btw here is a little tip I like to use when I am installing auto carpet. should anyone decide they want to put carpet in some where.

I have an old electrical tester that I broke years ago but it works great for this. if you can find the hole from the top just poke it through the carpet. or you can poke it up through the carpet from the other side. either way once the probe is poked through the hole this is for one of the seatbelt mounting tabs.


then take your soldering gun and it will melt right down along the probe and into the hole. if you poked it through from the bottom it will fall out or just pull it out from the top. then the soldering gun will melt the carpet back to the edges of the hole, you can move the gun around a bit to make the hole bigger. once you are done you have a hole that is melted just like you would do with the cut end of a nylon rope. it won't fray or pull the strands of the carpet like using a drill or hole saw.


ok so as I was installing the carpet I found some little things that needed to be addressed. there were some small parts that had surface rust, or just looked bad. like the tailgate latch.


so a little time with a wire wheel and my little scotch brite pad on my air sander.


and a little time with my eastwood powder coater.


a little wire wheeling, sanding and some chassis black.


then my wife bought me these little LED lights for my birthday and I did not really know what to do with them but I decided to put them on my center console. they stick on and are out of the way. I decided to just wire them into my light circuit so they come on whenever I turn on the lights.
to Illuminate the Dew lol.


carpet is in.


then I put new weatherstripping on the top and put it back on.

 
Then I finished the weatherstripping and sorted out the problems with the dome light. it was just a burnt fuse and a bad door jam switch, and a broken bulb. I also got the windshield wiper fixed. apparently I bent the little switch on the rear window.

 
So my daughter drove it that way until the following september. during this time period we discovered that if we let the jeep sit for a couple days it would take a bunch of pumping to get it started. Also I had had some trouble with my sons jeep cherokee's fuel injection system and I never really got it sorted out. so I decided I wanted another shot at it so I decided that I wanted to do a mopar MPFI swap. like I said before I had a 4.0 swapped jeep out in utah and I loved it. so I wanted the engine to look like a 4.0 not one of those howell fuel injection swaps. So I decided to do a hesco MPFI swap I also decided to swap a 4.0 HO head onto this engine since I happened to have one laying around. But I think I will save that for my next installment.
 
Glad I am not the only one with a 90 YJ around here.
 
But its my YJ.
lol


anyway. after I finished the top I let my daughter drive it to school for a couple months. It worked pretty well. I just locked the front end in with the posi lock so it acted like a tj and the only minor issue we had with it was that it took a lot of pumping to get it started in the morning. I had always planned to do a fuel injection conversion. I had initially thought about doing a 4.0 swap. I decided to just swap the 4.0 head on and convert to a Hesco MPFI system. that would increase my torque and improve driveability.


I had considered doing a cam swap but I decided against it.

first step to make access easier, pull the grill and radiator.


then I began disconnecting wiring and vacuum lines. then since we were going to pull the head it, is a lot easier to pull the head, intake and exhaust all at once than to do it separately.


so I set the engine at TDC and took the distributor cap off confirming that the rotor was pointed at number 1, and pulled the head.


then I had planned to change the timing set, so I pulled the harmonic balancer and the timing cover.

when I pulled the timing cover I found the crank sprocket positioned with the dot toward the cam sprocket. the cam sprocket dot however was 180 out. I rotated it around so the two dots are aligned. here is the pic.


however the rotor looks like this.


now keep in mind this engine was running just fine when I took it apart. but this as far as I know looks like the distributor is in 180 out of time. I called Hesco and asked them about it and they said to just re install everything like I took it out.

so I swapped the timing chain. it looks like this now.


the distributor looks like this.


before reinstalling the head I rotated the engine so the cam sprocket was at 1:00 and the crank sprocket was at 3:00 and counted pins. 15 count just like it should be. so I positioned it at TDC with the rotor pointing at number one again even though that means my timing dots are not aligned. reinstalled the head, torqued it properly.


now I need to pull the distributor
confused.gif
. the new distributor has a pin in it to keep it from rotating. My concern is that this looks like it is 180 out to me. should I reinstall it like it was? I know it is not that big of a deal to pull the distributor and swap it 180 but I wanted to get some more opinions before I pulled the distributor.
 
Since I wanted to do some checking before I did anything else, and the new harmonic balancer that is required to locate the crank position sensor, I ordered had not arrived yet anyway I started doing some detailing. I like to make things look nice when I put them back together besides just working right. so I started wire wheeling the exhaust manifold. I found a big crack in it. that explains why I could not get that stupid exhaust leak stopped. I thought it was coming from the flange. anyway I considered swapping in the header from the cherokee but when I put it on there it hits the shifter linkage. I considered modifying that, but then I would have had to run a custom exhaust from the header to the cat, and have an oxygen sensor bung welded into it as well. I also considered buying a new manifold. 259 dollars at NAPA. or a new header from summit 350 to 450. in the end I decided to see if someone could weld the manifold. I happen to know a guy, I work with his wife. anyway he has a welding and forge shop, does a lot of wrought iron work and can weld cast iron. he said he could fix it for me so I dropped it off at his shop, and I picked it up the next morning. I also had to swap in a new temp gauge sending unit because I broke the old one when I put the 4.0 in the cherokee.

since I was kind of at a stopping point Dad left for the night and I spent some time blasting and powdercoating some of the accessory brackets.

here are some of the pieces I powdercoated.


I also powdercoated the powersteering bracket red.

here is the valve cover. it is a stock valve cover off a 93 cherokee. I stripped it in my blast cabinet. then I powdercoated it white with my little eastwood kit.


then after that cooled I blew on the red. and wiped off the raised areas with masking tape. just blotting it on there, move blot etc.


then I baked it using a portable IR heater I got when I bought my powdercoating kit.

 
the nice thing about powdercoating is once you buy the kit, it cost less than 20 bucks in powder to do all that.

anyway if anyone is reading along on this they will already realize that the 4.2 exhaust manifold will not fit the 4.0 head without modification. so after spending 75 dollars to get it welded, and over an hour wire wheeling it and painting it with high temp paint, I have a really nice looking piece of scrap metal. so anyway I decided I would have to use the cherokee header. the downside to this is that I had to modify the shifter linkage bracket and I will have to custom fab the exhaust from the header to the catalytic converter and add an o2 sensor bung in the down pipe.

here is what the shifter linkage bracket looks like after I modified it.


I painted it with chassis black for rust prevention, and then I bought a downpipe from napa that a guy on another site suggested. it configures the exhaust pretty close to what I need. I will just have to cut it down and have it rewelded. I absolutely can't stand exhaust leaks so I will have the muffler shop guy do it for me.
 
2

Latest posts

Back
Top